Since it is now officially fall, I decided that for the sake of all things pumpkin spice I should give this recipe a shot. This inspiration was brought to me by “pin reaper” Azraelle and her failed attempt at the dessert.
So let’s get started!

The list of required ingredients wasn’t too extensive, so I was under the impression that this would be pretty easy to make. (Spoiler alert: I was wrong.)
The first of many tedious steps listed in this recipe is to beat your eggs for exactly 5 minutes. What happens when you beat them for 4 minutes? Or 6? Who knows.


Beautiful.
The next step says to “slowly” add in the sugar, pumpkin, and lemon juice followed by the rest of your dry ingredients.


So far, so good!
Now this is where things got complicated. After the ingredients have all been mixed, the next step instructs you to grease and flour a cookie sheet and pour your mixture in a rectangular shape while leaving space on the sides so the batter can expand while cooking. Typically I wouldn’t have thought twice about this step, but apparently this is where Azraelle messed up. So now as I’m excessively spraying and flouring my sheet, I’m slowly becoming paranoid as I wonder whether or not I chose a sheet big enough for my batter to grow.


Success!
At this point my hopes are pretty high and I’m actually starting to think that I may end up nailing this. Then I looked to see that the next step was the actual rolling process, and I was quickly brought back to reality. I wasn’t sure what I expected this process to be like, but I definitely was not prepared for the instructions that I was given. First, you need to lay out a terry cloth towel. Then, you cover it with exactly 1/4 cup of powdered sugar.
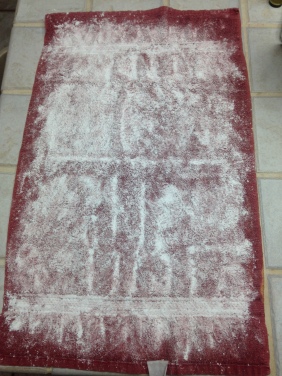
If you’re anything like me, feel free to use an entire cup instead.
The next step says to flip your unrolled roll onto your sugar covered towel, roll it up, and place it in the fridge so that it can cool into that shape. Honestly, I thought this was where I would mess up. Despite my success this late into the game though, I knew deep down that this was all too good to be true.


Time for the fridge!
While the roll cooled, it was time to make the cream cheese filling. This only consisted of four ingredients so it was pretty hard to mess this part up.


Yum!
Now for the hardest part, the actual process of creating the roll. I partially blame the instructions for what you’re about to see, because I was never told exactly how long to keep the roll in the fridge for. All the instructions say is that you are free to unroll your roll once the “roll has cooled in fridge”. How am I supposed to know when my roll has cooled or not?? When it’s too late, that’s when.
So after I pull it out of the fridge I slowly unroll my roll, which alone was a difficult task due to the fact that my roll had practically glued itself to the towel. (Thanks for nothing, powdered sugar.) Then I proceed to spread the cream cheese mixture onto the center, and as I am rolling it back up this is what I see:

I’m not an expert, but I’m pretty sure the center is supposed to be cooked.
Since I was prepared for a problem like this to occur, I decided to try and create a solution by holding the roll in place with saran wrap. Next, since the fridge previously failed to cool my roll, I decided to stick it in the freezer instead. After leaving it in there for about an hour, here was my final result.
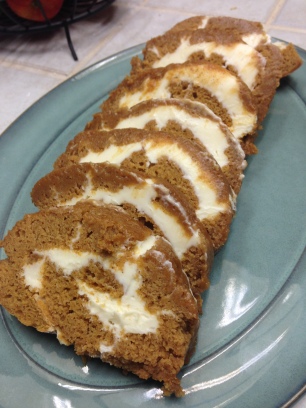
Although it didn’t end up as pretty as the picture displayed on the recipe’s webpage, the fact that it stayed somewhat together in a partially round shape makes me consider this cooking project a success! Not to mention this looks way better than Azraelle’s final product. (Sorry, girl.)
If you want to give this recipe a go, which I highly recommend because it’s freaking delicious, you can find it here.
